


-
Industries
Healthcare & Compliance
Patient data systems, compliance reporting, and workflow automation for regulated environments.
- HIPAA-aware integration pipelines
- Automated compliance dashboards
- Patient workflow digitization
Logistics & Supply Chain
Real-time tracking, route optimization, and inventory visibility across your distribution network.
- ERP/WMS integration
- Automated dispatch workflows
- Supply chain dashboards
SaaS & Tech-enabled
Scale your product infrastructure, integrate third-party tools, and ship features faster with reliable ops.
- API-first architecture
- Multi-tenant infrastructure
- CI/CD and release pipelines
Banking & Financial
Secure transaction processing, regulatory reporting, and customer-facing portals for financial services.
- Regulatory reporting automation
- Secure data integration
- Customer portal modernization
- Case Studies
Featured Case Studies
Browse all case studies →Euro Truck ServiceLogistics firm automated 12 manual workflows in a single 30-day sprint
"Read case study →Ergonnex AI 360Ergonnex AI 360 is a powerful project management platform that helps IT companies manage their projects better with built-in AI-powered analytics
Read case study →PanoramikPanoramic caters to your passion for sharing photos in a social media environment.
Read case study →

A crucial first step in automating and optimizing the software development process is establishing a Continuous Integration and Continuous Deployment (CI/CD) pipeline. We will go over best practices, integration techniques, and efficiency-boosting advice in this blog post as we walk through the process of building CI/CD pipelines for full-stack apps with Azure DevOps and GitHub Actions.
CI/CD: What is it?
The foundation of DevOps is continuous integration and continuous delivery, or CI/CD. By attaining incremental software delivery, it facilitates rapid software development and deployment, allowing for continuous value delivery to end users. Applications can be built, packaged, and tested automatically with continuous integration, or CI. The CD pipeline receives these builds as inputs.
Applications are automatically delivered to specific infrastructure environments, such as development, UAT, and production, using continuous delivery, or CD. Any software can be deployed on any platform with Azure DevOps.
Why Use Pipelines for CI/CD?
Software updates are delivered more quickly and reliably thanks to CI/CD pipelines, which automate the development, testing, and deployment of applications. They assist:
Cut down on human error.
Allow for ongoing feedback.
Make sure deployment procedures are consistent.
Establishing a strong CI/CD pipeline is essential for full-stack applications in order to preserve code quality and provide flawless user experiences.
How to set up a CI/CD pipeline
Let’s look at how to use Azure DevOps Pipelines to automate build and deployment processes.
Establish Your Own Azure DevOps Company
Go to https://dev.azure.com and log in to Azure DevOps as the first step. To store your projects, or repositories, you must at least establish an organization.
Make a Project
Kindly select values such as source control and visibility when creating an Azure DevOps project.
Creating a build pipeline
Setting up a series of automated procedures to build, test, and package your code is known as creating a build pipeline. This is a general guide to building a build pipeline that is specific to well-known tools like Jenkins, GitHub Actions, and Azure DevOps. For more specialized instructions, let me know if you’re using a particular tool or platform!
Typical Procedures for Establishing a Build Pipeline
1. Establish the Build Environment
Select a CI/CD tool from GitLab CI/CD, Jenkins, GitHub Actions, Azure DevOps, and others.
Install the necessary build agents (cloud-hosted or self-hosted) and set up the environment.
Install the necessary dependencies for your tech stack, such as Python, Node.js, and the.NET SDK.
2. Establish the repository for source code
Store your code on a version control platform, such as Bitbucket, GitHub, or Azure Repos.
Make sure the repository is properly organized, with distinct folders for tests, source code, etc.
Add the necessary configuration files (such as Dockerfile,.gitignore, etc.) and a README.md.
3. Arrange the Pipeline Phases
Source:
When changes are pushed to a particular branch, the pipeline is triggered.
Build: Put the code together.
Test: Execute automated tests.
The package Make a deployable artifact, such as a container image,.zip, or.jar file.
Deploy (if desired): Either publish the artifact or move it to a staging, production, or testing environment.
4. Define Build Script:
Depending on the tool, this can be a GUI-based setup or a YAML configuration file.
Specify each stage’s steps. An illustration of a pipeline based on YAML:
YAML Pipeline Example for Azure DevOps:

Create a Release Pipeline
The process of automating the deployment of your application to different environments (such as development, staging, and production) is known as a release pipeline. This is a general guide to release pipeline setup that can be customized for tools such as Jenkins, GitHub Actions, or Azure DevOps.
Typical Release Pipeline Steps
1. Specify the Release Phases
Development: Install in a test or development environment.
Staging: For validation, deploy to a pre-production environment.
Production: After validations and approvals, deploy to production.
2. Select a Plan for Deployment
Direct Deployment:
Launch the application right away in the intended environment.
Rolling Deployment: To guarantee zero downtime, replace instances incrementally.
Blue/Green Deployment: To reduce risks, switch traffic between two environments.
Canary Deployment: Prior to a full rollout, deploy to a subset of users.
3. Configure the intended environments
Verify the availability of the required infrastructure, such as servers and cloud environments.
For consistency, use infrastructure-as-code tools such as ARM templates, Terraform, or Bicep.
4. Describe Artefacts of Deployment
Among the possible artifacts are compiled binaries (.dll,.jar, etc.).
containers (like Docker images, for example).
scripts, such as those used for database migrations.
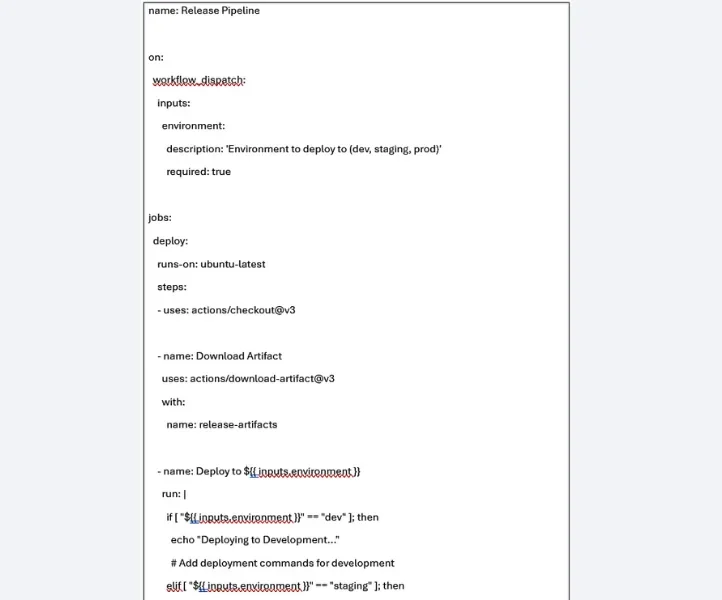
Sample Pipelines for Releases

Release Pipeline for Azure DevOps (YAML)


GitHub Actions Release Workflow

Key parts and steps of the Azure CI/CD process
A good way to automate the making, testing, and sending out of apps is to use an Azure CI/CD pipeline. Continuous deployment (CD) mixed with continuous integration (CI) helps you build nice software faster. Below is a list of the main parts and actions needed to set up and run an Azure CI/CD pipeline: Main parts of Azure Repos A place for source code to control versions.
Supported versions are Git and Team Foundation Version Control (TFVC).
Azure Pipelines
simplifies the steps of CI/CD for you.
allows YAML pipelines or traditional editors.
Create an agent
Run functions of the pipeline.
Azure gives you a hosted agent where the SDK and tools are pre-installed.
Self-Hosted Agents: Personalized agents that you control and are best suited for particular settings.
Artifacts from the Pipeline
files or packages (such as.zip,.jar, and container images) created during the build process for deployment.
Triggers
CI Triggers: initiate the process automatically the pipeline whenever a pull request is made or code is pushed.
CD Triggers: After a successful build, automatically add artifacts to environments.
The surroundings
Target deployment locations, such as development, staging, and production.
comprises rollback configurations and approval gates.
Library of Tasks
standardized tasks for routine operations (e.g., deploying apps, building code, and running scripts).
Gates of Release
Quality assurance is done in both automated and manual checks before proceeding to the next phase.
Important Stages of Azure CI/CD Pipeline
1. Continuous Integration (CI)
Purpose: Validate and package changes made to the code.
Steps:
Code Checkout: Fetching the source code from external repositories (such as GitHub or Azure Repos).
Project dependencies (like npm install and dotnet restore) are called restoring dependencies.
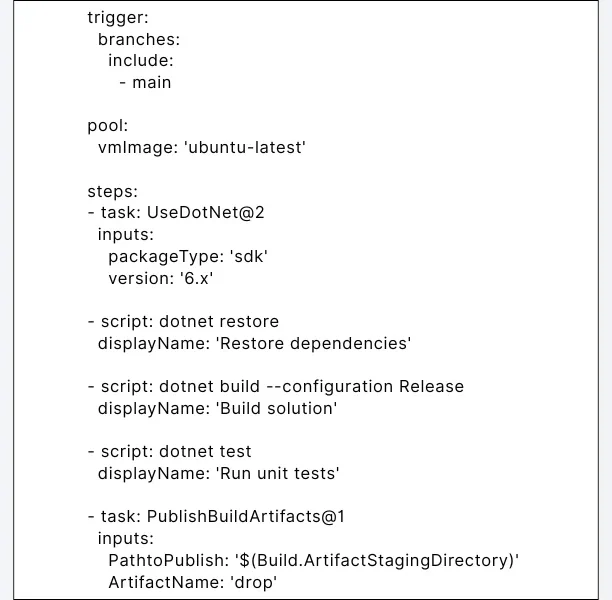
Build: Use a tool to build the application, for example mvn compile or dotnet build. Unit Tests: Run tests to verify that the changes made to the code work. Creation of Artifacts: Package the output of the build into a deployable format, such as.zip or.dll files. Artifact Publish: Upload the artifacts to Azure Pipelines so that they can be used in the CD process. YAML example for the CI stage:
2. CD, or continuous deployment
Deploy verified artifacts to the intended environments.
Actions to take:
Release Triggers: Start deployment automatically when an artifact becomes available.
Environment-Related Activities:
For testing, deploy to development.
For user acceptance testing (UAT), deploy to staging.
After receiving approvals, deploy to production.
Tests and Validation:
testing for integration.
testing for smoke.
Approval Gates: Before deploying to sensitive environments (like production), manual approval is required.
Use tools such as Azure Functions, Kubernetes, or Azure App Services for deployment.
An example of CD Stage YAML
yaml Copy Edit :

GitHub Actions for Continuous Integration/Continuous Deployment
Step 1: Establish a GitHub Actions Workflow
Inside your repository, head over to .github/workflows/.
Generate a fresh file titled ci-cd-pipeline.yml.
Step 2: Outline the Workflow

Connecting GitHub Actions to Azure DevOps
Advantages
unified cross-platform workflows.
improved deployment traceability.
freedom in selecting CI/CD tools.
How to Include
GitHub Actions to Start Azure DevOps Pipelines:

Using Databricks for CI/CD
Databricks workflow integration into CI/CD pipelines is supported by both GitHub Actions and Azure DevOps:
Steps in Databricks CI/CD:
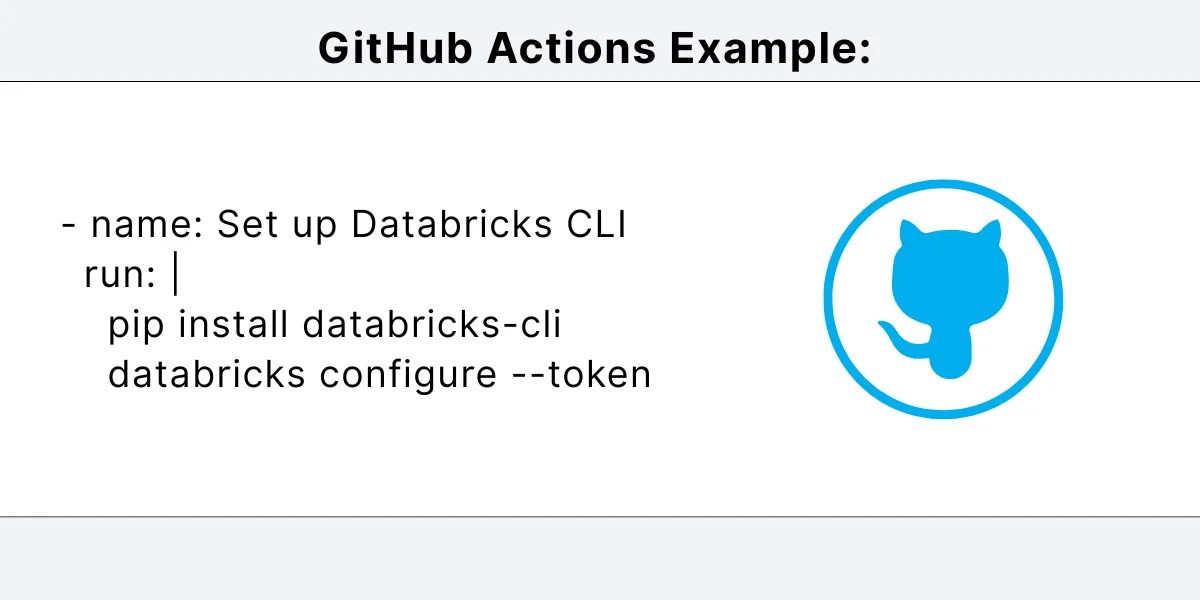
The Databricks CLI can be used to automate deployment.
Add scripts for deployment to your pipelines:
Example of Azure DevOps:

GitHub Actions Example:
Top techniques
Split and organize your pipeline into deploy, test, and build phases. Use approval gates: Set up Azure DevOps approval gates for key environments. Track pipeline metrics: Monitor performance using GitHub Insights and Azure DevOps. Secure secrets: Store credentials securely using GitHub Secrets or Azure Key Vault.
Implementing continuous integration and deployment for Node.js applications with Azure DevOps and GitHub Actions
Implementing continuous integration (CI) and continuous deployment (CD) for Node.js applications with Azure DevOps and GitHub Actions requires the integration of: Tools to efficiently build, test, and deploy your applications. Below are the step-by-step instructions:
1. Prepare your Node.js app.
Make sure the packages are valid in your application. JSON file with the required scripts:
{
“scripts”: {
“test”: “jest”, // Replace with your test runner
“build”: “webpack” // Replace with your build command
}
2. Add configuration files for testing or linting (e.g. .eslintrc.js, jest.config.js)
2. Set up an Azure DevOps pipeline

a. Start an Azure DevOps initiative: Create an Azure DevOps project. Link your Azure DevOps project to your GitHub repository.
Learn about Azure CI Pipelines for DevOps. Select Pipeline to create a new pipeline in Azure DevOps. Use the YAML pipeline editor to specify build and test steps. Example:
trigger:
branches:
include:
– main
pool:
vmImage: ‘ubuntu-latest’
steps:
– task: NodeTool@0
inputs:
versionSpec: ’16.x’ # Specify your Node.js version
displayName: ‘Install Node.js’
– script: npm install
displayName: ‘Install dependencies’
– script: npm test
displayName: ‘Run tests’
– script: npm run build
displayName: ‘Build application’
– task: PublishBuildArtifacts@1
inputs:
pathToPublish: ‘dist/’ # Path to build output
artifactName: ‘drop’
displayName: ‘Publish build artifacts’
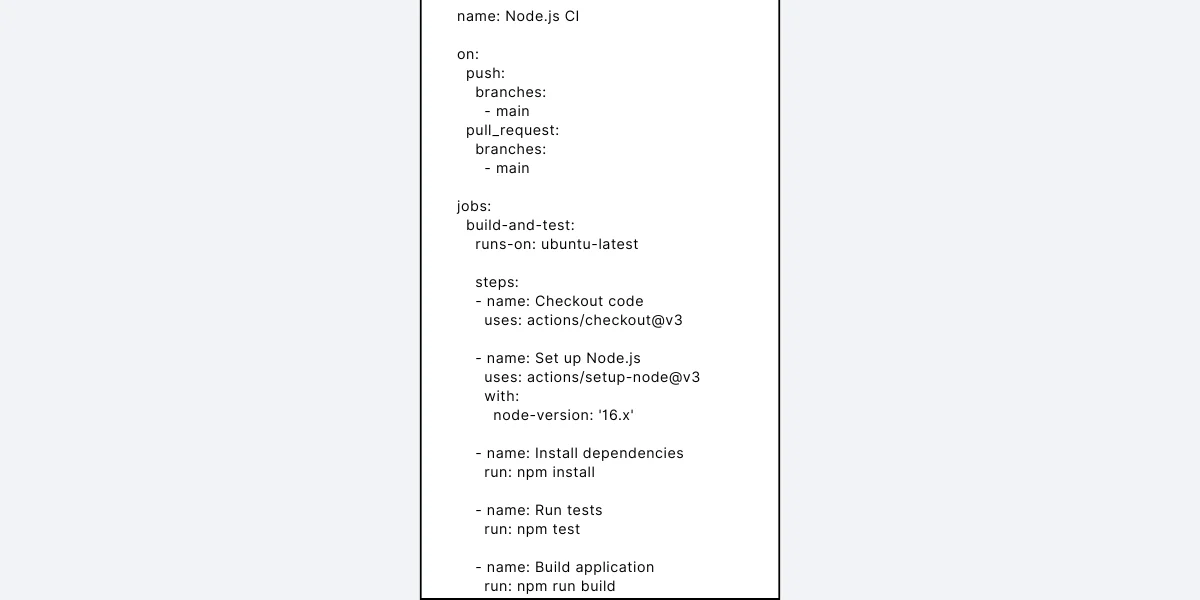
3. Configure CI using GitHub Actions:
Create a directory named .github/workflows/ in your GitHub repository.
Insert a file like ci.yml:
4. Setup CD
with Azure DevOps: a. Create a release schedule:
Create a release pipeline in Azure DevOps:
Insert steps for deploying your application e.g. Kubernetes, Azure App Service, Virtual Machines, etc.
Leverage published CI pipeline artifacts:
Use tasks such as Azure CLI and Azure App Service Deploy.
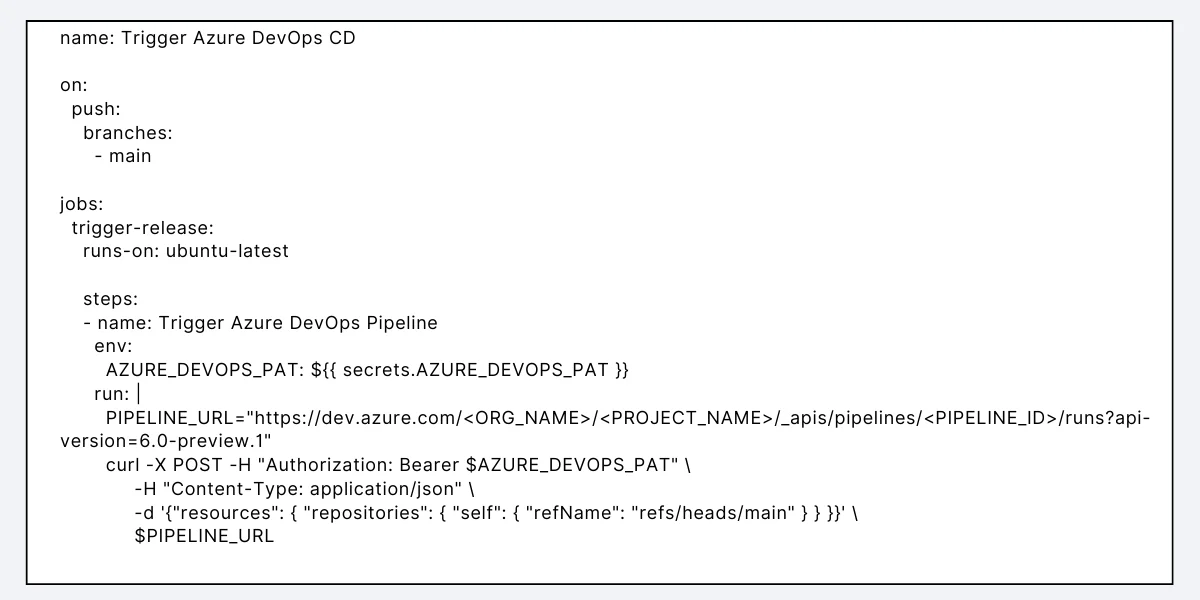
b. Link Azure DevOps releases to GitHub Actions
To initiate an Azure DevOps deployment, add a workflow to your GitHub repository:
5. Investigate your CI/CD process
Create a pull request or push changes to the main branch.
Verify that:
Your application is built and tested using a CI pipeline triggered by GitHub Actions.
If CI is successful, an Azure DevOps pipeline is triggered to deploy your application.
How to trigger an Azure DevOps pipeline from GitHub Actions for a full-stack project
By using the Azure DevOps REST API together with GitHub Actions workflows, you can trigger an Azure DevOps pipeline from GitHub Actions for a full-stack project to kick off your project. Here are the detailed steps:
1. First, install Azure DevOps Pipeline.
If you don’t already have a pipeline in Azure DevOps, create one for your project.
Enable Pipeline Trigger:
Go to Azure DevOps Pipeline Settings.
Enable CI Trigger if you want to start the pipeline when a branch is committed.
Alternatively, you can leverage the API or manual trigger.
2. Create a Personal Access Token (PAT):
In Azure DevOps, navigate to User Settings > Personal Access Tokens.
Create a new token with the scopes listed below:
Create (Read & Execute): This allows you to start a pipeline.
Optionally, you can add a project and team (read) for more complex situations. Store the generated token securely as you will need it in GitHub.
3. Set the PAT as a secret in GitHub.
Access the repository on GitHub.
Navigate to Settings > Variables and Secrets > Actions.
Create a new secret:
Name: AZURE_DEVOPS_PAT.
Value: Your Azure DevOps PAT token.
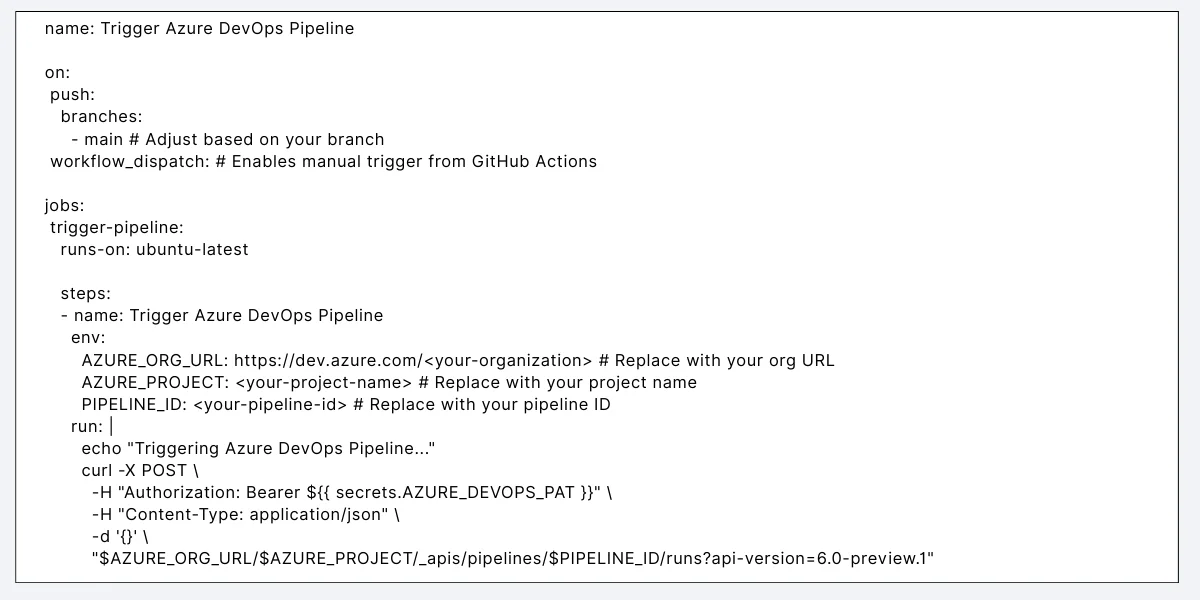
4. Configure the GitHub Actions workflow:
Create a file named trigger-pipeline.yml in your GitHub repository.
6. Tailor Workflow Initiators
To match your needs, adjust the workflow report’s on: section (e.g., branch, pull requests, guide dispatch).
7. Push
the.github/workflows/trigger-pipeline.yml report in your repository and check the Integration Commit.
You can manually begin the workflow from the GitHub Actions tab or push adjustments to the configured branch.
Make positive the Azure DevOps pipeline is running properly.
8. Track and troubleshoot
Look for errors withinside the GitHub Actions workflow logs.
Verify that the Azure DevOps pipeline runs successfully.


Blazor vs React for Enterprise Apps: When Each One Wins Rohit Dabra | April 28, 2026 Table of Contents Facebook-f Twitter Linkedin Blazor vs React is one of the most debated front-end decisions in .NET projects today. Enterprise builds and modernization efforts often bring this
Many enterprise teams treat identity and access as if they are the same thing. They aren’t. Identity confirms who a user is. Access defines what that user is allowed to do. Assuming that an authenticated identity automatically deserves access is one of the most common—and costly organizational security mistakes.

When discussions turn to hybrid and native app performance, Ionic is often the framework that gets questioned. Among cross-platform options such as React Native, Flutter, and Xamarin, the Ionic UI framework is known for helping teams get a mobile app to market faster. However, this speed is often viewed as a compromise on performance.


Sahil Kataria
Founder and CEO

Amit Kumar
Chief Sales Officer


QServices Inc. undertakes every project with a high degree of professionalism. Their communication style is unmatched and they are always available to resolve issues or just discuss the project.
