


-
Industries
Healthcare & Compliance
Patient data systems, compliance reporting, and workflow automation for regulated environments.
- HIPAA-aware integration pipelines
- Automated compliance dashboards
- Patient workflow digitization
Logistics & Supply Chain
Real-time tracking, route optimization, and inventory visibility across your distribution network.
- ERP/WMS integration
- Automated dispatch workflows
- Supply chain dashboards
SaaS & Tech-enabled
Scale your product infrastructure, integrate third-party tools, and ship features faster with reliable ops.
- API-first architecture
- Multi-tenant infrastructure
- CI/CD and release pipelines
Banking & Financial
Secure transaction processing, regulatory reporting, and customer-facing portals for financial services.
- Regulatory reporting automation
- Secure data integration
- Customer portal modernization
- Case Studies
Featured Case Studies
Browse all case studies →Euro Truck ServiceLogistics firm automated 12 manual workflows in a single 30-day sprint
"Read case study →Ergonnex AI 360Ergonnex AI 360 is a powerful project management platform that helps IT companies manage their projects better with built-in AI-powered analytics
Read case study →PanoramikPanoramic caters to your passion for sharing photos in a social media environment.
Read case study →

At First let’s have a look on some .net Fundamentals
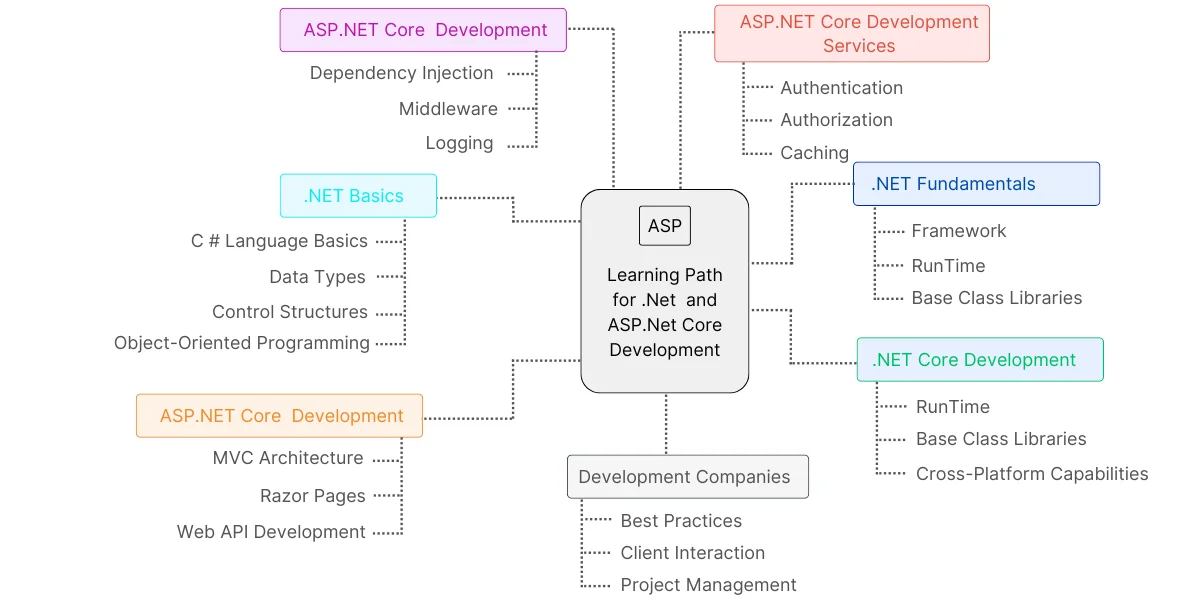
What is .NET?
To know about dot net fundamentals, .NET is basically a free and open-source developer platform created by Microsoft. It allows developers to create a wide variety of applications including web, mobile, desktop, games and more. It is versatile and supports multiple programming languages including C#, F# and Visual Basic. This is part of the .NET basics that any new developer needs to grasp.
Key Components of .NET
.NET Runtime:
- Executes applications and provides services like garbage collection, type safety, and exception handling.
.NET Libraries:
- A set of libraries (Base Class Library or BCL) that provide functionalities for strings, dates, file I/O, and more.
.NET SDK:
- Tools and libraries required to create, build, and run .NET Core development applications. This includes the compiler, runtime, and CLI tools.
Languages:
- .NET supports multiple languages. The most commonly used ones are C#, F#, and Visual Basic.
Let’s have a look on .net (CLR) Common Language Runtime
A .NET application runs the Common Language Runtime (CLR). Applications can run in a managed environment with features such as garbage collection, memory management, type safety, exception handling, and security. The Virtual Machine component of the .NET Framework (CLR). Is responsible for it.
Key Responsibilities of CRL:
Memory Management:
- Garbage Collection:
CLR automatically handles memory allocation and deallocation, freeing up memory occupied by objects that are no longer in use, thus preventing memory leaks.
Type Safety:
- CLR ensures that objects are used only in ways that are consistent with their type. This helps in preventing type errors that can lead to application crashes.
Security:
- CLR enforces security policies and ensures that code runs within defined permissions. It provides a layer of abstraction over the OS, which improves application security.
Exception Handling:
- CLR provides a structured exception handling mechanism. It allows developers to catch and handle exceptions gracefully, ensuring the application can manage errors effectively.
Just-In-Time (JIT) Compilation:
- Shortly before execution, CLR converts the Intermediate Language (IL) code to native machine code. Because of this, .NET apps can run on any platform without requiring any changes.
Interoperability:
- CLR enables .NET applications to interact with other applications or components written in different languages, such as JS, C++, COM, and Java.
How CLR Works / Compilation Process

Common Intermediate Language (CIL) is another name for the intermediate language (IL) that is created when you write.NET code. Any system that has a.NET runtime can execute this IL code because it is platform-independent.
Here’s an overview of the execution process:
Compilation:
Your source code is compiled by a .NET compiler into IL (Intermediate Language) code.
Example: You write a code in C# that Code will be converted to IL.
Loading:
The compiled IL code is loaded into the CLR environment.
JIT Compilation:
The JIT compiler translates the IL code into native machine code that the operating system can execute.
Execution:
While managing different runtime services like memory and exception handling, the CLR runs the native machine code.
Garbage Collection:
One of the CLR’s automatic memory management features is garbage collection. In order to stop memory leaks and enhance application performance, it periodically releases memory that has been used by objects that are no longer in use.
You can visit Common Language Runtime (CLR) overview – .NET | Microsoft Learn this website for more information
Assemblies
- The fundamental units of.NET programs are assemblies. These are libraries of compiled code that are used for security, versioning, and deployment. Two categories of assemblies exist:
- DLL (Dynamic Link Library): Used for class libraries.
- EXE (Executable): Used for applications.
Common Language Specification (CLS)
The (CLS) defines rules that all .NET languages must follow. Code written in any .NET language can be used by other .NET language with the help of CLS. For instance, the CLS guarantees that methods and data types are compatible with various.NET languages.
Managed Code
Managed Code that operates under the CLR’s supervision—which offers functions like garbage collection, exception handling, and type safety—is referred to as managed code. Unmanaged code, on the other hand, lacks these services and is run directly by the operating system.
Understanding the .NET Ecosystem
.NET Framework:
The original implementation of .NET, which is used primarily for building Windows applications.
.NET Core:
A cross-platform, open-source framework for building modern applications that can run on Windows, macOS, and Linux.
Xamarin/MAUI:
A framework for building mobile applications using .NET.
ASP.NET:
A framework for creating services and online apps. The most recent cross-platform iteration of ASP.NET is called ASP.NET Core.
Understanding .NET Core architecture for new developers:
It’s important to understand the architecture of .NET Core before diving deep into application development. Knowing how the framework is structured and its components will help you better design and optimize your applications.
Let Us Discuss some difference between the Asp.Net Core and .Net

To Get started with the .net firstly we need to have the knowledge of following concepts:
The main language used for.NET development is C#. Familiarity with C# syntax and features will be very helpful. If you’re new to C#, consider going through some introductory tutorials.
Understanding of Object-Oriented Programming (OOP)
.NET is heavily based on object-oriented programming. You should understand the four main principles of OOP:
- Encapsulation:
Encapsulation is the process of combining data and methods that work with the data into a single entity, like a class.
- Inheritance:
inheritance encouraging code reuse by creating new classes from pre-existing ones. Mainly for Code reusability.
- Polymorphism:
The capacity to handle things in diverse ways according on their class or data type.
- Abstraction:
Presenting only the essential functionality while concealing the intricate implementation details.
Basic Understanding of Web Technologies
- If you’re planning to work with ASP.NET Core (for web development), familiarity with web technologies like HTML, CSS, and JavaScript will be beneficial.
SQL and Database Concepts
- Understanding databases and SQL will be important if you plan to build applications that interact with databases. Familiarity with basic SQL commands (SELECT, INSERT, UPDATE, DELETE) and database concepts like normalization can be helpful.
You can prefer .NET documentation | Microsoft Learn this source to learn about these concepts.
Step-by-Step Guide: How to install .NET Core on Windows
1.Download the .NET Core SDK:
- Go to the official Microsoft .NET download page.
Install .NET on Windows – .NET | Microsoft Learn
- Choose the Windows Installer option.
How to Install .NET Core: Beginner’s guide to .NET Core development
2.Run the Installer:
- Once the download is complete, double-click the .exe file to start the installation.
- Follow the prompts in the installation wizard.
3.Verify the Installation:
- Open Command Prompt (you can search for “cmd” in the Start menu).
- Type dotnet –version and press Enter.
- If the command returns the version number, the installation was successful.
4.Set Up Your Development Environment:
- Visual Studio: Download and install Visual Studio from the official Visual Studio download page.
Here’s a step-by-step guide to installing Visual Studio 2022 on Windows:
Step-by-Step Guide to Install Visual Studio 2022
1.Download the Installer:
- Go to the official Visual Studio download page.
- Choose the version of Visual Studio 2022 you want to install (Community, Professional, or Enterprise).
- Click the “Download” button to get the installer.
Install Visual Studio and choose your preferred features | Microsoft Learn
2.Run the Installer:
- Once Double-click the.exe file to begin the installation after the download is finished.
- You may need to run the installer as an administrator.
3.Select Workloads:
- The installer will open and show a list of workloads. These are collections of related features and tools1.
- Select the workloads that match your development needs. For example, if you’re working on web development, you might select “ASP.NET and web development” and “.NET desktop development”.
4.Install Individual Components:
- After selecting the workloads, you can also choose individual components that you need.
- Click on the “Individual components” tab and select the components you want to install.
5.Choose Installation Location:
- By default, Visual Studio will be installed in the “C:\Program Files (x86)\Microsoft Visual Studio\2022” directory.
- You can change the installation location if needed.
6.Install:
- Click the “Install” button to start the installation process.
- The installer will download the necessary files and install Visual Studio.
7.Complete the Installation:
- Once the installation is complete, restart your computer.
- After restarting, open Visual Studio 2022 from the Start menu.
8.Sign In or Skip:
- When you first open Visual Studio, you’ll be prompted to sign in with your Microsoft account or skip the sign-in process.
- Choose your preferred option.
9.Set Up Your Environment:
- You can customize your Visual Studio environment by selecting themes, fonts, and other settings.
- Explore the interface and familiarize yourself with the tools and features available.
10.Create Your First Project:
- To create your first project, click on “Create a new project”.
- Follow the prompts to select a project template and configure your new project

Now Let’s learn the MVC architecture, Dependency Injection, Repository pattern, Asynchronous Programming, Entity Framework. We will learn all these things with the practical implementation so, it will be easy for us to learn.
We will make an Employee registration Web App by using the .Net Core MVC basically it is our simple CURD operations.
Step 1. Open the Visual Studio and select Create a new Project.
Step 2. Then search for ASP .Net Core Web App (Model-View-Controller) with C#. Then Next
Step 3. Now give the name of the project and browse the location then click Next
Step 4. Select the framework in this project we will select the 8.0. Then click on create
Step 5. At the top you can se a View option click on that and then Solution Explorer

Now, First thing we need to do is to install the all required Packages
Step 6. Install all required Packages

Microsoft.EntityFrameworkCore.Design
Microsoft.EntityFrameworkCore
Microsoft.EntityFrameworkCore.SqlServer.
Microsoft.EntityFrameworkCore.Tools.
Microsoft.AspNetCore.Mvc.Razor.RuntimeCompilation — it is for getting code updates just by refresh, after using it we did not need to restart the project again and again after any code update.
Go to Tool => NuGet Package Manager => Manage NuGet Package Solution
Search for all the required packages and install them according to your project version.
In same way install all the packages.
You can check all these installed packages by double click on the project name Under the solution Explorer
Step 7. Set Up the connection string

Goto solution explorer and select the appSetting.json
Write your connection string
Now configure this connection string in Program.cs file
Now Add new ApplicationDbContext which is responsible for our database connection
Right Click on project name under solution Explorer and add class named as ApplicationDbContext Now add all these thing in Program.cs file
Build Solution
To add your connection Open the Package Manger Console and then run commad
Add-Migration InitialLoad
Then Update-Database
And now your database connection is ready.
You can check this connection By Sql Server Object Explorer
Click on View => Sql Server Object Explorer; find you server name which you have added in connection string and then find the database.
Step 8. Now add Model; Right click on Model folder then Add Class give the name of the class
Add the properties in the class
Add this class in ApplicationDbContext class
Then in package manager Add-Migration Employee
Update-Database
After this step you employee table will be add in your database you can check it in you SQL Server Object Explorer.
Step 9. Now we add repository for making the methods, Which contains functionality of Create Update Delete and Read Data from Database.
Right click on Project and then Add New folder named as Repository
Now Right click on Repository Folder and then add Interface Named as IEmployeeRepository here we define our methods.
Step 10 : Now add the EmployeeRepository class in Repository folder
Implement this in EmployeeRepository Folder
Now Add this IEmployeeRepository and EmployeeRepository in Program.cs file for DI
// Register the EmployeeRepository and IEmployeeRepository for dependency injection builder.Services.AddScoped<IEmployeeRepositroy, EmployeeRepository>();
Step 11. Now add the EmployeeController in Controller Folder
Now in controller we can add further functionality
Ctor is the short way to add constructor
In this way Inject the dependency, and add the other functionality
Tip: Use Try Catch block for exception handling.
Step 12. Now Create the View
Right click under the Index Action and click on add view
In this view we write the html code to display our employee list
In Same Add View for the Create and details
Same for edit but the details comes automatically for the selected employee
View for Delete
Now Add the Employee button in Navbar
Go to View-Shared-> _Layout.cshtml
Here’s the flow of the ASP.NET Core MVC lifecycle.
Flow:
Request is routed to the appropriate Controller.
The Controller processes the request, interacts with the Model, and returns a View or ActionResult to the client.
Here are some .NET Core programming best practices to help you develop robust, efficient, and maintainable applications:
Select the correct version
- Always use the latest stable version of .NET Core to benefit from performance improvements and security updates
Use asynchronous programming
- Use asynchronous APIs to improve performance. This allows your application to handle multiple requests simultaneously without blocking threads.
Cache aggressively
- Implement caching to reduce server load and improve response time. Use caching for frequently used data.
Optimize data access
- Use efficient data access patterns and optimize database queries. Consider using Entity Framework Core for database operations.
Enable compression
- Enable compression for your HTTP responses to reduce the size of data transmitted over the network.
Use Dependency Injection
- Using dependency injection to manage dependencies and improve testability. .NET Core has built-in support for dependency injection.
Implement logging
- Use a logging framework to capture important information about your application’s behavior. This helps in debugging and monitoring.
Follow coding standards
- Follow coding standards and best practices to ensure code quality and maintainability.
Test automation
- Implement automated testing to catch bugs early and ensure your code works as expected. Use unit tests, integration tests, and end-to-end tests.
Secure your app
- Follow security best practices and protect your application from common vulnerabilities. Use HTTPS, validate inputs, and manage user authentication and authorization properly.
Profile and Performance Optimization
- Use profiling tools to identify performance bottlenecks and optimize your code. Tools like PerfView can help you analyze your application’s performance.
Conclusion
You’ve made excellent progress through this comprehensive guide, and it’s clear you now have a strong understanding of .NET Core’s core principles and development tools. From building your first application to mastering key concepts like Dependency Injection and Entity Framework, you’re now in a great position to tackle larger, more complex projects. As you continue to explore .NET Core and its ecosystem, remember that the tools available are vast, and mastering them will help you become proficient in ASP.NET Core development services. Take time to explore further topics such as cloud computing, API design, and performance optimization as part of your ongoing journey into .NET Core development services.


Choosing between Dynamics 365 vs Salesforce is rarely about which platform has the longer feature list. For businesses already running Microsoft 365, Azure, and Teams, a dynamics 365 crm implementation often wins on integration, total cost, and how quickly your team actually adopts it. Salesforce

Pipeline failures can be expensive and harmful to the environment. Companies are using IoT applications in the oil and gas industry to prevent these breakdowns and stay ahead of problems.
![Azure IoT vs AWS IoT vs Google IoT Pricing: Feature Comparison Chart for Enterprise [2025]](https://www.qservicesit.com/wp-content/uploads/2025/03/Microsoft-Teams-vs-Slack-vs-Zoom-TCO-Analysis-for-Enterprise-Organizations-2.webp)
The Internet of Things (IoT) helps businesses run better by connecting devices, collecting information, and improving choices. But picking the best IoT cloud provider can be confusing. The main three are AWS IoT vs Azure IoT vs Google IoT.


Sahil Kataria
Founder and CEO

Amit Kumar
Chief Sales Officer


QServices Inc. undertakes every project with a high degree of professionalism. Their communication style is unmatched and they are always available to resolve issues or just discuss the project.
